개킹받는 것임
UITableView / UICollectionView를 사용하는 가장 큰 이유는 Cell을 재사용함으로써 보다 효율적으로 UI 및 데이터 관리를 할 수 있기 때문이다. 그런데 이 셀을 사용하다보면 재사용하는 과정 속에서 UI가 업데이트 되는 것과 데이터가 업데이트 되는 것의 차이가 생겨 원하는 모습으로 업데이트가 되지 않는 것을 확인할 수 있다.
Cell의 Life Cycle과 재사용 메커니즘을 잘 이해하고 있어야 하는 이유도 여기에 있다.
.. 그래서 이 글에서 셀의 생애주기와 재사용 메커니즘에 대해서 정리할 것임 .. (아 이거 진심 .. 매번 해도 매번 모르겠음 .. >< .. )
Life Cycle
UI를 그려보자.
먼저 간단하게 UITableViewCell을 하나 만들고 UITableView에 올려보자.

위의 UI는 코드는 [더보기]를 누르면 확인할 수 있음 근데 유료결제 ㅈㅅ. 구라임.
파일 나누기 귀찮아서 ViewController에 다 넣었음요. 참고 부탁.
import UIKit

import SnapKit

class ViewController: UIViewController {

    private var tableView: UITableView = {
        let tableView = UITableView()
        return tableView
    }()

    private let dataList: [String] = ["소연", "후리", "수빙", "후니", "준준", "훈지", "듀나", "규민", "황쥐"]

    override func viewDidLoad() {
        super.viewDidLoad()
        configureUI()
        setConstraints()
    }

    private func configureUI() {
        configureTableView()
    }

    private func setConstraints() {
        view.addSubview(tableView)

        tableView.snp.makeConstraints { make in
            make.top.leading.trailing.bottom.equalTo(view.safeAreaLayoutGuide)
        }
    }

    private func configureTableView() {
        tableView.register(MainTableViewCell.self, forCellReuseIdentifier: MainTableViewCell.identifer)

        tableView.delegate = self
        tableView.dataSource = self
    }
}

// MARK: - UITableView Protocol

extension ViewController: UITableViewDelegate {

}

extension ViewController: UITableViewDataSource {
    func tableView(_ tableView: UITableView, numberOfRowsInSection section: Int) -> Int {
        return dataList.count
    }

    func tableView(_ tableView: UITableView, cellForRowAt indexPath: IndexPath) -> UITableViewCell {
        guard let cell = tableView.dequeueReusableCell(withIdentifier: MainTableViewCell.identifer, for: indexPath) as? MainTableViewCell else { return UITableViewCell() }
        cell.setData("Index: \(indexPath.row) - \(dataList[indexPath.row])")
        return cell
    }
}

// MARK: - Cell

final class MainTableViewCell: UITableViewCell {
    static let identifer = "MainTableViewCell"

    private var titleLabel: UILabel = {
        let label = UILabel()
        label.textColor = .darkGray
        label.font = .systemFont(ofSize: 15)
        return label
    }()

    override init(style: UITableViewCell.CellStyle, reuseIdentifier: String?) {
        super.init(style: style, reuseIdentifier: reuseIdentifier)
        configureUI()
        setConstraints()
    }

    required init?(coder: NSCoder) {
        fatalError("init(coder:) has not been implemented")
    }

    private func configureUI() {
        contentView.backgroundColor = .white
    }

    private func setConstraints() {
        contentView.addSubview(titleLabel)

        titleLabel.snp.makeConstraints { make in
            make.leading.equalToSuperview().inset(20)
            make.centerY.equalToSuperview()
        }
    }

    func setData(_ data: String) {
        titleLabel.text = data
    }
}
Delegate / DataSource 채택
UI를 만들었다면, Cell의 Life Cycle에 해당하는 Delegate / DataSource 들을 구현해서 콘솔에 찍어보자.
// MARK: - UITableView Protocol

extension ViewController: UITableViewDelegate {
    func tableView(_ tableView: UITableView, willDisplay cell: UITableViewCell, forRowAt indexPath: IndexPath) {
        print(#function)
    }

    func tableView(_ tableView: UITableView, didEndDisplaying cell: UITableViewCell, forRowAt indexPath: IndexPath) {
        print(#function)
    }
}

extension ViewController: UITableViewDataSource {
    func tableView(_ tableView: UITableView, numberOfRowsInSection section: Int) -> Int {
        return dataList.count
    }

    func tableView(_ tableView: UITableView, cellForRowAt indexPath: IndexPath) -> UITableViewCell {
        guard let cell = tableView.dequeueReusableCell(withIdentifier: MainTableViewCell.identifer, for: indexPath) as? MainTableViewCell else { return UITableViewCell() }
        cell.setData("Index: \(indexPath.row) - \(dataList[indexPath.row])")
        print(#function, indexPath.row)
        return cell
    }
}
그리고 Cell의 Initializer에도 함수를 콘솔에 찍어보자.
override init(style: UITableViewCell.CellStyle, reuseIdentifier: String?) {
    super.init(style: style, reuseIdentifier: reuseIdentifier)
    print("--------------------------", #function, "--------------------------")
    configureUI()
    setConstraints()
}

required init?(coder: NSCoder) {
    fatalError("init(coder:) has not been implemented")
}

override func prepareForReuse() {
    print(#function)
}

deinit {
    print("--------------------------Deinit--------------------------")
}
그러면 아래와 같이 콘솔 창에 찍히는 것을 확인할 수 있다.
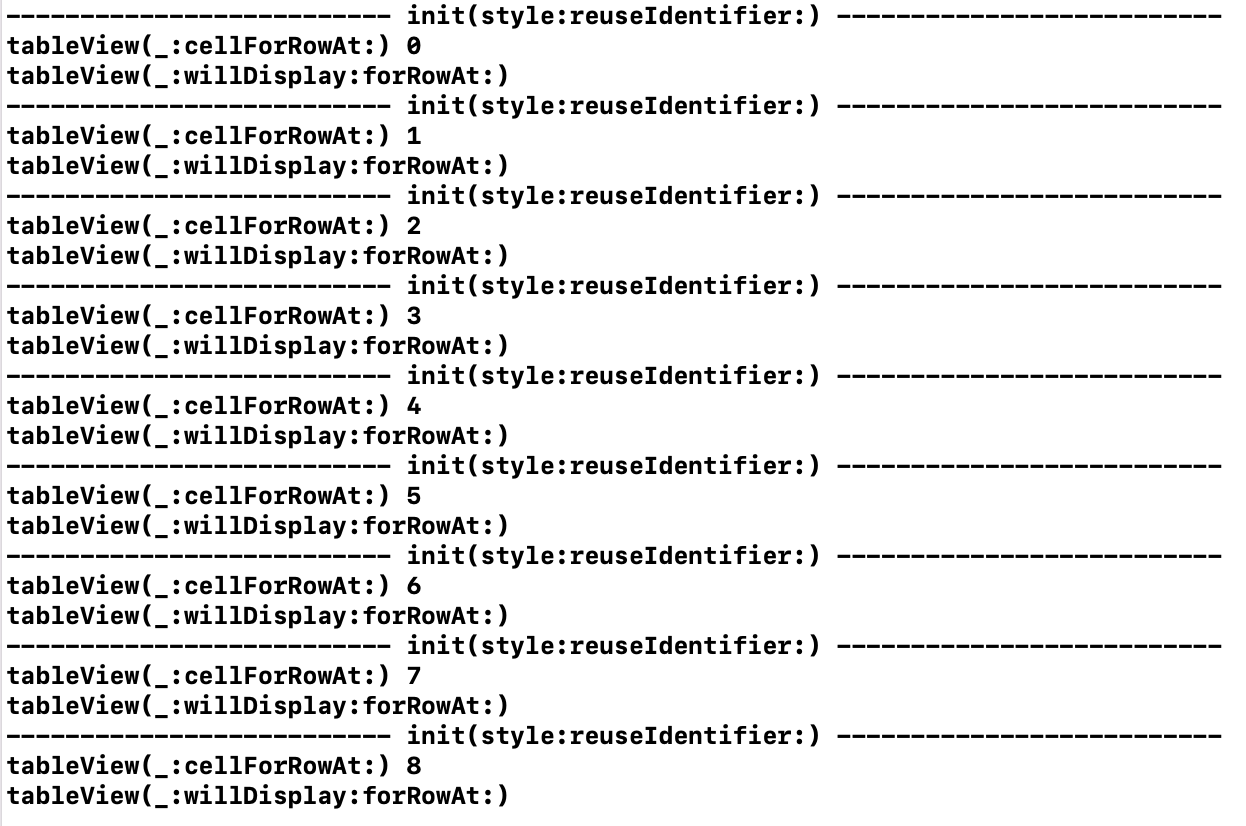
Cell이 만들어질 때,
- 초기화 구문이 호출
- cellForRowAt 으로 셀을 만들어 준 뒤에
- willDisplay가 실행되는 것을 볼 수 있다.
하나씩 살펴보면
override init(style: UITableViewCell.CellStyle, reuseIdentifier: String?)
셀의 초기화 작업을 한다. (ViewController의 viewDidLoad와 같이)
*코드 베이스로 UI를 구성했는데, Stroyboard / Xib 파일을 기준으로 만들었다면, awakeFromNib이 해당한다.
tableView(_ tableView: UITableView, cellForRowAt indexPath: IndexPath)
UITableView의 특정 위치에 넣을 Cell을 DataSource에 요청하는 함수이다.
tableView(_ tableView: UITableView, willDisplay cell: UITableViewCell, forRowAt indexPath: IndexPath)
UITableView의 셀을 그리기 전에 Delegate에 이 메시지를 전달하는 함수이다.
Prefetching
그리고 무한스크롤 할 때 많이 사용하는 pre-fetch가 언제 불리는지 알아보자.
일단 스크롤이 되어야 하므로 데이터의 개수를 늘리고 protocol을 채택해야한다.
    private let dataList: [String] = ["소연", "후리", "수빙", "후니", "준준", "훈지", "듀나", "규민", "황쥐",
                                      "1소연", "후리", "수빙", "후니", "준준", "훈지", "듀나", "규민", "황쥐",
                                      "2소연", "후리", "수빙", "후니", "준준", "훈지", "듀나", "규민", "황쥐"]

    private func configureTableView() {
        tableView.register(MainTableViewCell.self, forCellReuseIdentifier: MainTableViewCell.identifer)

        tableView.delegate = self
        tableView.dataSource = self
        tableView.prefetchDataSource = self ✅

        tableView.rowHeight = 47
    }

...

extension ViewController: UITableViewDataSourcePrefetching {
    func tableView(_ tableView: UITableView, prefetchRowsAt indexPaths: [IndexPath]) {
        print(#function, "\(indexPaths)")
    }

    func tableView(_ tableView: UITableView, cancelPrefetchingForRowsAt indexPaths: [IndexPath]) {
        print(#function)
    }
}
이렇게 작성하고 빌드 후 아무것도 건들이지 않고 콘솔 창을 보면

스크롤 하지 않고 한번에 보이는 데이터까지 초기화 > 셀 갖고 오기 > willDisplay 과정을 거쳤다는 것을 확인할 수 있다.
그리고 이제 스크롤을 하면,

diplay 되는 셀까지 만들어진 후에 prefetch가 작동한다. 그리고 화면에 보이는 셀 이후의 셀들을 미리 호출하고 있다.
끝까지 계속 내리다보면,

이렇게 더이상 초기화 메서드가 호출되지 않고, 그 대신에 prepareForReuse() 메서드가 호출되는 것을 볼 수 있다.
tableView(_ tableView: UITableView, willDisplay cell: UITableViewCell, forRowAt indexPath: IndexPath)
prefetch를 할 때 필수적으로 구현해야 하는 함수로,
IndexPath에 해당하는 셀에 필요한 데이터를 미리 받아오는 함수이다. 10개의 셀을 미리 받아온다.
(*GCD 또는 비동기를 명시할 때 사용한다.)
tableView(_ tableView: UITableView, didEndDisplaying cell: UITableViewCell, forRowAt indexPath: IndexPath)
prefetch가 필요하지 않는 셀들의 prefetching을 취소하는 함수로,
✔️ 일반적으로 스크롤 방향이 바뀔 때 데이터 로딩이 덜 된 셀들을 취소할 수도 있고
✔️ 불필요한 작업을 최소화해서 CPU 작업 시간을 줄여주는 함수이다.
스크롤을 하면서 새롭게 찍힌 함수들을 살펴보면 두 가지가 있다.
1. tableView(_:didEndDisplaying:forRowAt:)
2. prepareForReuse()
tableView(_:didEndDisplaying:forRowAt:)
display 되던 셀이 사라지면 호출되는 함수이다.
prepareForReuse()
테이블 뷰 Delegate에 의해 재사용이 가능한 셀을 준비하는 함수이다.
만약 셀이 재사용 된다면 dequeueReusableCell 함수가 리턴되기 전에 호출된다.
처음에는 init 과정을 통해 화면에 보이는 셀만 생성했지만,
이후로 재사용 큐에 넣었던 셀을 사용하기 때문에 셀을 다시 생성하지 않고 재사용하게 되는 것이다.
(= 재사용된 셀을 사용할 때 prepareForReuse()가 호출되는 것)
Reuse Mechanism
영어로 쓰니까 꽤나 있어보임 .. ? ㅋㅎ ..
앞에서 셀의 생애주기를 짧게 다뤄봤는데 ..
> 셀이 한번에 보이는 UI/데이터에 대해서는 셀을 생성하지만, 이후로는 셀을 재사용해서 보여주고 있다.
여기서 셀의 재사용 메커니즘을 확인할 수 있다.
테이블 뷰가 출력해야 하는 데이터가 많을 경우, 이를 모두 셀로 만들어서 처리하면 메모리 소모가 많고, 스크롤이 버벅대거나 앱 실행 자체가 느린 현상이 발생할 수 있다.
(+ 사용자가 모든 데이터를 다 확인할 것이라는 보장도 없다 .. )
➡️ 재사용 메커니즘은 이런 현상을 방지하고 자연스러운 스크롤을 제공하기 위해 도입된 개념이다.
✅ 테이블 뷰는 표현해야 할 목록이 아무리 많아도 목록 전부를 한꺼번에 셀로 생성하지 않는다.
✅ 메모리를 절약하기 위해서 화면에 보여줄 수 있는 딱 그만큼의 셀을 생성해서 출력한다.
✅ 나머지 셀은 스크롤이 발생했을 때 생성해서 목록에 추가하며 동시에 스크롤에 의해 화면에서 벗어난 셀은 목록에서 뺀다.
✅ 이때, 새로운 셀을 매번 생성하는 것은 부담, 화면에서 벗어나 목록에서 제외된 셀 객체를 메모리에서 매번 삭제하는 것 역시 낭비 >> 그래서 iOS는 목록에서 제외된 셀을 지우지 않고 재활용하여 다시 사용할 수 있도록 처리 >> 이것이 재사용 메커니즘의 핵심이다.
스크롤에 의해서 목록 제일 위 또는 아래의 테이블 셀이 화면을 벗어나면,
> 이 셀은 목록에서 제거된 후
> 임의의 저장소에서 기다린다.
> 언제까지? 다시 사용될 때까지!
저장소 내부에서 먼저 저장된 셀들이 소멸하지 않고 대기하고 있다가 새로운 테이블 셀이 필요하다는 요청을 받으면 순서대로 불려 나간다.
그리고 다시 그 위치에 맞는 셀의 데이터로 꾸며서 목록에 추가되고
이 흐름은 사용자가 테이블 뷰를 스크롤 하는 동안에 발생한다.
(-> 스크롤 하지 않으면 셀의 데이터가 중복되지 않는데, 스크롤하면 이전 데이터가 남아 있는 현상이 이 때문이다. 🫠)
저장소?
화면 바깥으로 벗어난 셀이 재사용되기 전까지 머무는 저장소가 바로 재사용 큐이다.

dequeueReusableCell(withIdentifier:) 메소드는 재사용 큐에 대기하고 있는 셀을 꺼낼 때 호출하는 메소드
이 메소드는 재사용 큐를 뒤져서 대기하고 있는 셀 인스턴스가 있다면 이를 꺼내어 제공하고 없다면 nil 반환한다.
여기서 identifier의 역할은 원하는 셀을 꺼내올 수 있도록 하는 재사용 식별자이다.
이 메소드를 호출할 때는 "MainTableViewCell" 처럼 원하는 객체를 가르키는 값을 인자 값으로 넣어주어야 한다.
재사용 큐에는 재사용 메커니즘을 따르는 여러 종류의 객체들이 저장되어 있으므로 그 중에서 우리가 원하는 건 ~ 이니 이 이름으로 캐싱되어 있는 셀이 있으면 꺼내주세요. 하고 상세하게 요청해야 하기 떄문이다. 이것을 재사용 식별자라고 한다.
그로 인한 문제점들
셀을 재활용/재사용하다 보니 생기는 몇 가지 문제점 중 하나는 셀의 UI 또는 Attribute들이 중첩되거나 반복되는 경우이다.
문제에 따라서 해겨할 수 있는 방법이 조금 다르긴 한데,
1. 만약 이미지 또는 텍스트 등이 중첩되는 경우(= 그래서 잔상이 남는 경우)
이 문제의 경우 prepareForReuse를 통해서 해결할 수 있다.
앞서, Life Cycle에서 tableView(_:cellForRowAt:) 메서드가 호출되기 전에 prepareForReuse() 메서드가 호출되는 것을 확인했다.

셀이 재사용 되기 전 자동으로 이 메서드를 호출하기 때문에 여기서 잔상이 남는 UI에 대해 nil로 처리하면 된다.
override func prepareForReuse() {
    print(#function)
    titleLabel.text = nil
}
2. 버튼 등의 true/false 상태가 초기화 되어 있는 경우가 있다.
이 경우에는 조금 귀찮지만 .. (다른 해결방법을 찾지 못함 .. ) 각 경우에 대해서 분기처리를 제대로 해주면 된다.
위의 코드에서 버튼만 추가해보자 ..
[더보기] 누르면 UI 코드 있음요 ㅎ..ㅎ
이것도 제법 귀찮네요 .. ㅋㅎㅋㅎ
// Cell ⬇️
final class MainTableViewCell: UITableViewCell {

    static let identifer = "MainTableViewCell"

    var buttonClosure: (() -> ())? // ✅ 클로저 사용

    private var titleLabel: UILabel = {
        let label = UILabel()
        label.textColor = .darkGray
        label.font = .systemFont(ofSize: 15)
        return label
    }()

    private lazy var button: UIButton = {
        let button = UIButton()
        button.setTitle("", for: .normal)
        button.setImage(UIImage(systemName: "star"), for: .normal)
        button.addTarget(self, action: #selector(touchUpButton), for: .touchUpInside)
        return button
    }()

    var isButtonSelected: Bool = false {
        didSet {
            button.setImage(isButtonSelected ? UIImage(systemName: "star.fill") : UIImage(systemName: "star"), for: .normal)
        }
    }

    override init(style: UITableViewCell.CellStyle, reuseIdentifier: String?) {
        super.init(style: style, reuseIdentifier: reuseIdentifier)
        print("--------------------------", #function, "--------------------------")
        configureUI()
        setConstraints()
    }

    required init?(coder: NSCoder) {
        fatalError("init(coder:) has not been implemented")
    }

    override func prepareForReuse() {
        print(#function)
        titleLabel.text = nil
    }

    deinit {
        print("--------------------------Deinit--------------------------")
    }

    private func configureUI() {
        contentView.backgroundColor = .white
    }

    private func setConstraints() {
        contentView.addSubview(titleLabel)
        contentView.addSubview(button)

        titleLabel.snp.makeConstraints { make in
            make.leading.equalToSuperview().inset(20)
            make.centerY.equalToSuperview()
        }

        button.snp.makeConstraints { make in
            make.centerY.equalToSuperview()
            make.trailing.equalToSuperview().inset(20)
        }
    }

    @objc func touchUpButton() {
        buttonClosure?()
    }

    func setData(_ data: String) {
        titleLabel.text = data
    }
}

// View Controller ⬇️
extension ViewController: UITableViewDataSource {
    func tableView(_ tableView: UITableView, numberOfRowsInSection section: Int) -> Int {
        return 30
    }

    func tableView(_ tableView: UITableView, cellForRowAt indexPath: IndexPath) -> UITableViewCell {
        guard let cell = tableView.dequeueReusableCell(withIdentifier: MainTableViewCell.identifer, for: indexPath) as? MainTableViewCell else { return UITableViewCell() }
        cell.setData("Index: \(indexPath.row) Cell")

        cell.buttonClosure = { [weak self] in
            cell.isButtonSelected.toggle()
        }

        print(#function, indexPath.row)
        return cell
    }
}
그리고 실행해보면,
이렇게 .. 개킹받게 선택하지도 않은 셀에서 선택이 되거나 .. 선택한 셀이 선택이 안되거나 .. 하는 모습을 볼 수 있다 ..
우하하 .. (웃다보니 웃을 때가 아님 ..)
이것을 해결할 방법은 ..
1. 버튼의 선택/미선택에 관한 [Bool] 배열을 만들고 인덱스 값을 통해 배열의 값을 변경해서 테이블의 데이터를 리로드 하는 방법
private var boolList: [Bool] = [false, false, false, false, false, false,
                                false, false, false, false, false, false,
                                false, false, false, false, false, false]
이렇게 위와 같이 선택/미선택에 대한 데이터를 담을 bool형 배열을 선언하고
    func tableView(_ tableView: UITableView, cellForRowAt indexPath: IndexPath) -> UITableViewCell {
        guard let cell = tableView.dequeueReusableCell(withIdentifier: MainTableViewCell.identifer, for: indexPath) as? MainTableViewCell else { return UITableViewCell() }
        cell.setData("Index: \(indexPath.row) Cell")

        // ✅ 버튼의 상태에 따라서 UI를 변경하고 변경할 때마다 테이블 뷰를 갱신
        cell.isButtonSelected = boolList[indexPath.row]
        cell.buttonClosure = { [weak self] in
            self?.boolList[indexPath.row].toggle()
            self?.tableView.reloadData()
        }

        print(#function, indexPath.row)
        return cell
    }
이렇게 버튼의 상태를 전달한 뒤에 그 상태에 맞게 UI를 갱신하는 것이다.
2. 특정 row의 값을 설정하는 것
또 다른 방법으로는 특정 indexPath.row의 값으로 셀의 버튼 상태를 지정하는 것이다.
위의 두가지 방법은 검색해서 찾으면 많이 나오는 방식인데 .. 사실 최적의 방법이라는 생각이 들지 않아서 ..
좀 더 찾아보고 다시 정리를 해야겠다 ..
후 .. 어떻게 좀 좋은 방법이 없나!?!?!
'iOS' 카테고리의 다른 글
| 소깡이의 URLSession과 친해지기 프로젝트 (0) | 2022.09.02 |
|---|---|
| 탕수육 찍먹해? 그럼 MVVM도 찍먹해. (1) | 2022.09.01 |
| Realm에 Repository Pattern을 곁들인 (0) | 2022.08.28 |
| Database인데 Realm을 곁들인 (1) | 2022.08.27 |
| App Sandbox 그리고 Files (2) | 2022.08.27 |